This last two weeks has been hectic, Toowomba for a few days, then Maroochydore for another couple, never ending rain and wind has kept me busy...still taking trees to the dump!...anyway, started thinking about access to the battery, so decided to hinge the whole seat...started by making a trial pivot point at the front....
Then, using the back mount point, I am trying this plate, secured to the floor, and a thru hole to lock the seat down...also notice the plate for the earths to go to, and most of the wiring runs in the cavity between the fibreglass body and the steel floor
A piece of tube welded to the seat frame, then cut the centre out to go on the pivot....
Scoured Capalaba Spare Parts wreckers, but couldn't find the type of latch I needed, so decided to make my own, a simple plate/bolt/ slide deal that works just fine.
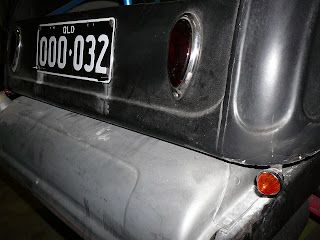
Even though I mounted these indicators, I'm not happy...to me they stand out like a wart on the end of your meat mallet....so I'm just not sure....maybe if it was mounted further under...or maybe some of the harley style might look better....but..
I saw these on US e buy and have them on the way, leds with indicator and stop built in might do...they look a bit washed out....so, watch this space...
I have the doors finished as I want them, with a bit of extra bracing and some Sikaflex and bondo to hold them together, so now to finalise the door trims
My first choice was to cut out some 3mm MDF....then I thought about not using upholstery and using painted alloy or ply...so now I have ply.....think I might just paint them flat black and start covering them in decals.....or abstract paint....wallpaper...
I collected a bunch of bits to hold the trim on....so it will either be the ruff n ready metal thread screws....or maybe the nice stainless button-heads...but probably the proper upholstery pieces....


No comments:
Post a Comment